XCUITest Tutorial: iOS UI Tests with Real Examples (2026)
XCUITest is the common name for iOS UI testing with Apple’s XCTest and XCUIAutomation frameworks: Swift code that launches your app on a simulator or device, finds buttons and labels through the accessibility tree, taps and types, and checks what’s on screen. You write the tests in a UI Testing Bundle target and run them with Xcode or xcodebuild test, so you need a Mac with Xcode to run them. This guide covers the parts you need for real tests: queries, accessibility identifiers, launch arguments, alerts, waiting without sleeps, debugging a query, and running tests from the command line and in CI.
Every test and every line of output here comes from runs I did on October 27, 2026. I gave Claude Code, on a Linux machine with no Mac, a small counter app and asked it to add two features and write UI tests for them. It wrote 4 new UI tests, and all 9 tests in the project passed on its first run. Disclosure: I make macbox, the cloud Mac the tests ran on. Everything about XCUITest itself works the same on your own Mac.
What XCUITest is
Two Apple frameworks do the work. XCTest gives you test cases and assertions (XCTestCase, XCTAssertEqual). XCUIAutomation gives you the UI side; in Apple’s words, “Use the XCUIAutomation framework to control your app’s user interface and inspect its state. Use XCTest to write tests that control your app using XCUIAutomation, and check if your app’s state matches your expectations.” A plain import XCTest at the top of the test file is enough for everything below; that’s all the tests in this guide import.
UI tests are different from unit tests in one way that drives everything else: the test can’t call your code. It sees the app the way a user (or VoiceOver) does, through the accessibility tree, so you find a button by its label or identifier, not by a variable name.
In the test code you’ll mostly use three classes:
| Class | What it is | You use it to |
|---|---|---|
XCUIApplication |
“A proxy that can launch, monitor, and terminate a test application” | launch(), set launchArguments and launchEnvironment |
XCUIElementQuery |
A search for elements: app.buttons, app.staticTexts, app.textFields, app.alerts |
Narrow it with a subscript: app.buttons["resetButton"] |
XCUIElement |
One element on screen | tap(), typeText(_:), swipeUp(), read .label and .exists, waitForExistence(timeout:) |
Add a UI test target
In Xcode: File > New > Target, choose UI Testing Bundle, and pick the app as the target to test. Xcode adds a UI test target and a starter test file.
If the project is generated with XcodeGen, the target is a few lines of project.yml. This is the one from the app in this guide:
  TallyUITests:
    type: bundle.ui-testing
    platform: iOS
    sources: [TallyUITests]
    dependencies:
      - target: Tally
    settings:
      base:
        PRODUCT_BUNDLE_IDENTIFIER: com.example.TallyUITests
        GENERATE_INFOPLIST_FILE: YES
        TEST_TARGET_NAME: Tally
Then add the target to the scheme’s test targets, or xcodebuild test won’t run it. (For more on generating projects, see XcodeGen for coding agents.)
The app under test
The app is Tally, a SwiftUI counter. It has a count label, a Reset button, and a +1 button. For this guide the agent added a Step text field that sets how much the add button adds (type 3 and the button reads +3), and a “Reset the count?” alert with Cancel and Reset.
Here’s how the app looks to a UI test. This is the accessibility tree, printed by macbox ui describe while the app ran in the Simulator:
Application "Tally" at 0,0 size 402x874
  StaticText "Step" at 139,93 size 35x20
  TextField value="1" id=stepField at 183,86 size 80x34
  StaticText "0" id=countLabel at 170,374 size 62x115
  Button "Reset" id=resetButton at 122,742 size 83x50
  Button "+1" id=incrementButton at 222,742 size 58x50
Each id= is an accessibility identifier, set in SwiftUI with one modifier:
Text("\(counter.count)")
    .accessibilityIdentifier("countLabel")
Use identifiers for anything a test touches. A label like “+1” changes as soon as someone changes the step, a translator touches it, or a designer renames it. An identifier changes only when a developer changes it.
Your first XCUITest example
import XCTest

final class TallyUITests: XCTestCase {
    override func setUp() {
        continueAfterFailure = false
    }

    func testTappingPlusOneTwiceShowsTwo() {
        let app = XCUIApplication()
        app.launch()

        let label = app.staticTexts["countLabel"]
        XCTAssertTrue(label.waitForExistence(timeout: 5))
        XCTAssertEqual(label.label, "0")

        let plusOne = app.buttons["incrementButton"]
        plusOne.tap()
        plusOne.tap()

        XCTAssertEqual(label.label, "2")
    }
}
Line by line:
continueAfterFailure = falsestops the test at the first failed assertion. The default istrue, which for a UI test usually means a cascade of failures after the first real one.app.launch()is synchronous. Apple: “When it returns, the application launches and is ready to handle user events.” If the app is already running, it’s terminated first, so every test starts a fresh process. Data the app saved, like UserDefaults, is still there unless you reset it, for example with a launch argument.app.staticTexts["countLabel"]is a query for a text element with that identifier. Nothing is looked up until you use it.waitForExistence(timeout: 5)waits up to 5 seconds and returnsfalseif the element never shows up. Wrap it inXCTAssertTrue, or a missing element passes silently..labelon a static text is its text, so you can assert on what the user sees.
Typing into a text field
func testTypingStepChangesIncrement() {
    let app = launch()
    let label = countLabel(in: app)

    let stepField = app.textFields["stepField"]
    XCTAssertTrue(stepField.waitForExistence(timeout: 5))
    stepField.tap()
    stepField.typeText("3")

    let increment = app.buttons["incrementButton"]
    XCTAssertTrue(increment.waitForExistence(timeout: 5))
    XCTAssertEqual(increment.label, "+3")

    increment.tap()
    increment.tap()
    XCTAssertEqual(label.label, "6")
}
Tap the field before typeText. Apple’s docs: “The element or a descendant must have keyboard focus; otherwise the system raises an error.” Note that the button is still found by its identifier even though its label changed from “+1” to “+3”, which is the point of identifiers.
launch() and countLabel(in:) are two small helpers the agent added to the test class:
private func launch(startCount: Int? = nil) -> XCUIApplication {
    let app = XCUIApplication()
    if let startCount {
        app.launchArguments += ["-startCount", String(startCount)]
    }
    app.launch()
    return app
}

private func countLabel(in app: XCUIApplication) -> XCUIElement {
    let label = app.staticTexts["countLabel"]
    XCTAssertTrue(label.waitForExistence(timeout: 5))
    return label
}
Launch arguments: start the app in a known state
Tapping +1 forty-two times to test what happens at 42 is slow and fragile. Pass the state in instead. The test sets launchArguments before launch():
func testStartCountLaunchArgument() {
    let app = launch(startCount: 42)
    let label = countLabel(in: app)
    XCTAssertEqual(label.label, "42")

    app.buttons["incrementButton"].tap()
    XCTAssertEqual(label.label, "43")
}
The app reads them at startup:
@main
struct TallyApp: App {
    var body: some Scene {
        WindowGroup {
            ContentView(startCount: Self.startCount())
        }
    }

    /// Reads `-startCount N` from the launch arguments so UI tests can start from a known count.
    private static func startCount() -> Int {
        let args = ProcessInfo.processInfo.arguments
        guard let index = args.firstIndex(of: "-startCount"),
              args.indices.contains(index + 1),
              let value = Int(args[index + 1]) else { return 0 }
        return value
    }
}
Set arguments before launch(). Apple’s docs say changes made after launch “don’t affect the current launch session, but do take effect the next time the application launches.” The same pattern works for logging in a test user, pointing at a staging server (launchEnvironment is a dictionary of environment variables), or skipping onboarding.
Alerts: find buttons by label, scoped to the alert
Tapping Reset shows this:
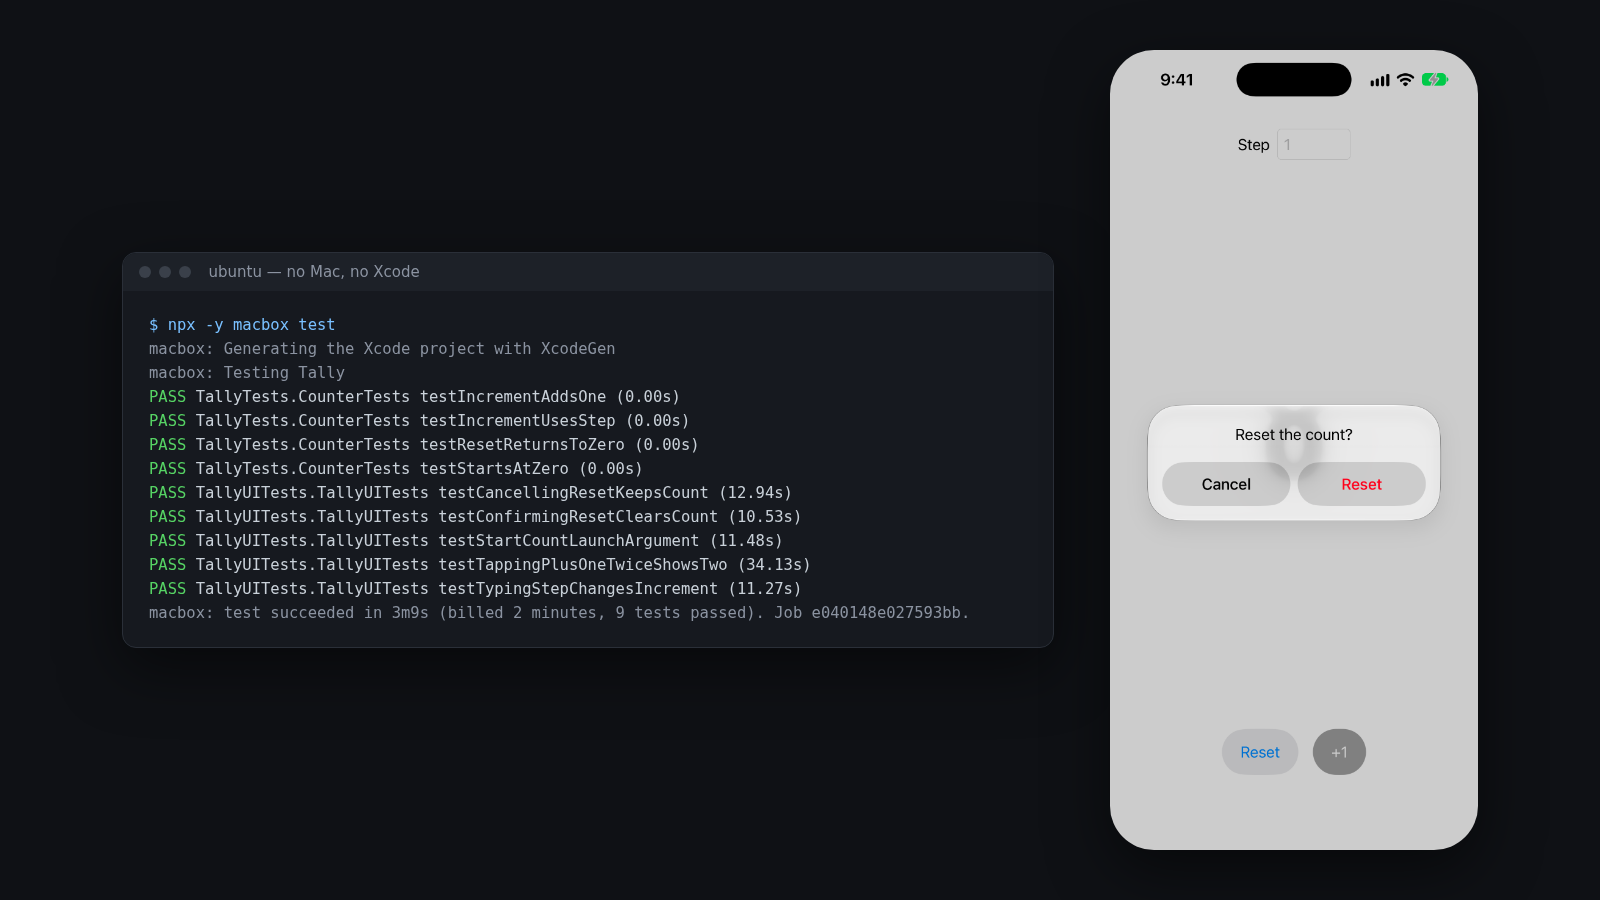
And the accessibility tree gains this (scroll-bar lines removed):
Sheet "Reset the count?" at 41,388 size 320x126
  StaticText "Reset the count?" at 71,410 size 260x20
  Button "Cancel" at 57,450 size 140x48
  Button "Reset" at 205,450 size 140x48
The alert’s buttons have labels but no id=; the app never set any. Rather than add them, the agent found them by label inside the alert, scoping the query to the alert so “Reset” doesn’t match the app’s own Reset button:
func testConfirmingResetClearsCount() {
    let app = launch(startCount: 5)
    let label = countLabel(in: app)
    XCTAssertEqual(label.label, "5")

    app.buttons["resetButton"].tap()
    let alert = app.alerts["Reset the count?"]
    XCTAssertTrue(alert.waitForExistence(timeout: 5))
    alert.buttons["Reset"].tap()

    waitForDisappearance(of: alert)
    XCTAssertEqual(label.label, "0")
}
app.alerts["Reset the count?"] matched, even though the tree printout above calls the element a Sheet. A Cancel test is the same with alert.buttons["Cancel"] and an expected count of 5.
An alert your test expects, because the test just tapped the button that shows it, is handled like this: wait for it, then tap. For alerts that can appear at unpredictable moments, like a system permission prompt, Apple has addUIInterruptionMonitor(withDescription:handler:) on XCTestCase. You register handlers, and they’re “invoked in the reverse order in which they are added until one of the handlers returns true, indicating that it has handled the alert.”
Wait for things. Don’t sleep.
UI tests are flaky when they assume the screen has already changed. sleep(2) makes them slow and still flaky. Wait for the condition instead:
waitForExistence(timeout:)for something that should appear.waitForNonExistence(timeout:)for something that should go away.- For any other condition, an
XCTNSPredicateExpectation. The agent used this longer form to wait for the alert to close; it works for any property you can write as a predicate:
private func waitForDisappearance(of element: XCUIElement) {
    let gone = XCTNSPredicateExpectation(predicate: NSPredicate(format: "exists == false"), object: element)
    XCTAssertEqual(XCTWaiter().wait(for: [gone], timeout: 5), .completed)
}
When a query doesn’t find the element
Print what the test sees. Put this in the test where it fails:
print(app.debugDescription)It can show the descendant tree with each element’s type, label and identifier, much like the macbox ui describe output above. Then fix the query. A few tools for awkward cases:
- When several elements share a label, scope the query to their container (
alert.buttons["Reset"], as above) or give them identifiers..firstMatchis a speed-up for a query you know has one match, not a way to pick among several. app.cells.element(boundBy: 0)picks by position. Use it for lists, not for buttons whose order can change.app.descendants(matching: .any)["countLabel"]finds an identifier whatever the element type is.app.swipeUp()scrolls when the element is below the fold.
To see the screen at the moment of failure, attach a screenshot. It shows up in the test report:
let shot = XCTAttachment(screenshot: app.screenshot())
shot.lifetime = .keepAlways
add(shot)
Run UI tests from the command line
On a Mac, xcodebuild runs the whole scheme:
xcodebuild test -scheme Tally -destination 'platform=iOS Simulator,name=<simulator name>'Use the name of a simulator you have installed; xcrun simctl list devices available lists them. To run one test, pass -only-testing with an identifier of the form test_target/test_type/test_function:
xcodebuild test -scheme Tally -destination 'platform=iOS Simulator,name=<simulator name>' \
  -only-testing:TallyUITests/TallyUITests/testConfirmingResetClearsCount
xcodebuild prints a lot. Pipe it through xcbeautify or xcpretty if a person is reading it; if an agent is reading it, give it the failure lines and skip the rest.
Run XCUITest in CI
CI is the same xcodebuild test on a Mac runner. A minimal GitHub Actions job for this app looks like this. I haven’t run this workflow; it’s the command above plus project generation:
name: UI tests
on: [push]
jobs:
  ui-tests:
    runs-on: macos-latest
    steps:
      - uses: actions/checkout@v4
      - run: brew install xcodegen && xcodegen generate
      - run: |
          SIM=$(xcrun simctl list devices available | grep -m1 -o 'iPhone [^(]*' | sed 's/ *$//')
          xcodebuild test -scheme Tally -destination "platform=iOS Simulator,name=$SIM"
Drop the xcodegen step if you commit your .xcodeproj. CI suits a check on every push. It’s slow for an agent in the middle of a task, which has to push, wait for a runner, and read a log back.
Running XCUITests without a Mac
Running iOS UI tests needs Xcode on a Mac, plus an iOS simulator or a connected device. Xcode and the Simulator only run on macOS; there’s no Linux build of either. If you develop on Linux or Windows, or your coding agent runs in a cloud sandbox, the tests have to run on a Mac somewhere: one you own over SSH, a CI service like GitHub Actions macOS runners or Xcode Cloud, or a cloud Mac you call from the command line.
This is the run from the start of this guide. Claude Code ran on Ubuntu with only a macbox API key in its environment. Its whole job took 4 minutes 29 seconds and 8 turns: it read the code, read macbox --help, wrote the features and tests, ran macbox test --dry-run to check what would be uploaded, and then ran the tests once:
$ npx -y macbox test
...
macbox: Synced 7 changed of 7 files
macbox: Generating the Xcode project with XcodeGen
macbox: Testing Tally
PASS TallyTests.CounterTests testIncrementAddsOne (0.00s)
PASS TallyTests.CounterTests testIncrementUsesStep (0.00s)
PASS TallyTests.CounterTests testResetReturnsToZero (0.00s)
PASS TallyTests.CounterTests testStartsAtZero (0.00s)
PASS TallyUITests.TallyUITests testCancellingResetKeepsCount (12.94s)
PASS TallyUITests.TallyUITests testConfirmingResetClearsCount (10.53s)
PASS TallyUITests.TallyUITests testStartCountLaunchArgument (11.48s)
PASS TallyUITests.TallyUITests testTappingPlusOneTwiceShowsTwo (34.13s)
PASS TallyUITests.TallyUITests testTypingStepChangesIncrement (11.27s)
macbox: test succeeded in 3m9s (billed 2 minutes, 9 tests passed). Job e040148e027593bb.
That’s one line per test instead of the full xcodebuild log, which matters when an agent has to read it. One test on its own uses the same --only-testing identifier as xcodebuild:
$ npx -y macbox test --only-testing TallyUITests/TallyUITests/testConfirmingResetClearsCount
PASS TallyUITests.TallyUITests testConfirmingResetClearsCount (16.12s)
macbox: test succeeded in 1m27s (billed 1 minute, 1 tests passed). Job ea0cdb17f4ec2ae5.
And a failure. I changed the expected count in one test from 43 to 44 to see what the agent gets back:
$ npx -y macbox test --only-testing TallyUITests/TallyUITests/testStartCountLaunchArgument
.../TallyUITests/TallyUITests.swift:95: error: -[TallyUITests.TallyUITests testStartCountLaunchArgument] : XCTAssertEqual failed: ("43") is not equal to ("44")
FAIL TallyUITests.TallyUITests testStartCountLaunchArgument (13.12s)
error: tests failed
macbox: 1 of 1 tests failed (billed 1 minute). Job 2276dd364aa267ec.
The file, the line, both values, and exit code 1: enough to tell whether the test or the app is wrong. Everything in this guide, the agent run, the two single-test runs and a live session for the screenshot, cost $0.25 at macbox’s $0.05 per Mac minute. macbox runs the Simulator only, and doesn’t support React Native or Flutter projects yet.
Tips for letting an agent write your UI tests
What worked in this run, and what I’d put in the agent’s instructions (CLAUDE.md, AGENTS.md or a Cursor rule):
## UI tests
- Add .accessibilityIdentifier to every control a test touches.
- Find elements by identifier. Inside system-styled alerts, find buttons by label, scoped to the alert.
- Start the app in the state the test needs with launch arguments, not by tapping through setup.
- Wait with waitForExistence or an expectation. Never sleep.
- Run one test with --only-testing while fixing it; run the whole suite before you finish.
My prompt asked for identifiers, launch arguments and no sleeps. The rest the agent worked out itself: scoping the alert query, adding three small helpers, waiting for the alert to close, and checking with --dry-run what it was about to upload.
What XCUITest can’t do
- Know about your framework. XCUITest drives any iOS app through its accessibility tree, React Native and Flutter apps included, but it knows nothing about JavaScript or Dart state. Those teams often use their framework’s own tools. Appium’s iOS driver is built on XCUITest, so it needs a Mac too.
- visionOS apps. Apple: UI testing “isn’t available to apps you build using the visionOS SDK.”
- Stand in for a real iPhone. XCUITest runs on devices too, but in the Simulator you have no real camera, and performance numbers don’t represent a phone. For devices, use your own iPhone or a device cloud.
FAQ
Is XCUITest the same as XCTest?
XCTest is the test framework: test cases, assertions, test runs. XCUITest is the common name for UI testing on top of it, with the UI classes (XCUIApplication, XCUIElement) in Apple’s XCUIAutomation framework. You write both kinds of tests in Swift and run them the same way.
Can I record a UI test instead of writing it?
Yes. Put the cursor inside an empty test method and click the record button (the red dot) at the edge of Xcode’s editor. Xcode writes queries and actions as you use the app, and offers alternative queries for each element; pick the one by identifier or label, not by index. Then add assertions; Apple notes that a test with no assertions “passes if it runs to completion without throwing any errors.”
Why does my test fail with “element not found” when I can see the element?
Usually the test looked before the element appeared, or the query is wrong. Use waitForExistence, and check the query against the accessibility tree: Xcode’s Accessibility Inspector on a Mac, or macbox ui describe while the app runs in a macbox session.
How do I run a single XCUITest from the terminal?
xcodebuild test -scheme <Scheme> -destination '<simulator>' -only-testing:<Target>/<Class>/<testMethod>. With macbox, macbox test --only-testing <Target>/<Class>/<testMethod>.
Can I run XCUITests on Linux or Windows?
Not locally. The tests need Xcode, which only runs on macOS. You can write them on Linux or Windows and send them to a Mac to run, which is what the run in this guide did. New macbox accounts get $10 of credit, about 200 Mac minutes.
More guides
Claude Code for iOS, even without a Mac, XcodeGen for coding agents, and iOS builds from cloud agents.